Hella CELIS Headlight Install
First things first.
Required Tools
- Small straight Screwdriver
- Medium straight Screwdriver
- Needle Nosed Pliers
- Torx T30 Screwdriver or Drill Bit (much easier)
- Torx T25 Screwdriver or Drill Bit
- An extra set of hands for the last step.
Step 1 - Unclipping the hood latch
Pretty straight forward, lift up the latch and then pry the two sides of the pull lever apart with the screwdriver or by sticking the needle nosed pliers in there. Be careful, this piece is way to fragile for it's own good.
Step 2 - Disconnecting the Grill
Use the small screwdriver to pull the plugs out from their socket. After removing them you can pry the grill off. It is held in place with a few pins on the bottom and then 3 push in pins on the top. Tilt the grill forward and then lift it up and out.
Step 3 - Unscrew the Bumper
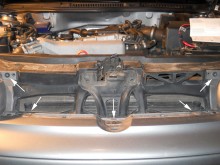
First to come out are the 5 screws that were previously covered by the grill. These take a T30 and are relatively straight forward but I'll show them anyways.
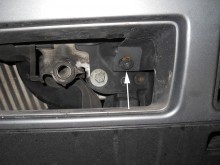
Next up are the single screws behind each lower fog light / fake inlet cover. The screws are pretty easy to get out (again T30) but the plastic blanks were a bit of a pain. Easiest method I found is to reach in with your fingers and press up on the tabs (shown below). You can then pry the blanks out from the top tilting towards the front.
Finally there are four screws in the front fender liner. I didn't even bother taking pictures of these because with the wheel turned you can clearly see them.
So now you should have removed the following:
- 5 screws from under the grille
- 1 screw under the plastic blank x 2 sides
- 4 screws in the front fender liner x 2 sides
If you have removed all of those then you're ready to remove the bumper.
Removing the bumper
This is easiest to do with two people. Make sure you're pulling evenly and straight forwards and it should just slide off. Keep in mind there may be a wire going to the bumper sidemarker light on each side but it should have enough slack that it doesn't need to be disconnected.
Here it is removed.
Home stretch now!
Replacing the headlight
Each headlight assembly is held in with four T25 screws, two on the top and two on the bottom. There is a single connector at the back with a large push tab that can be undone with just your fingers. (Don't use any tools, like everything on this car it's fragile and breaks quite easily.)
Here are the bottom screws.
Once you've installed the new headlight, I would strongly recommend connecting up everything and testing them to make sure they work. If for some reason they don't, I'm sure you'd rather realize that now than after putting everything back together.
There we go! All done (while almost).
Reassembly
Everything in the reverse order... Some notes:
- Each side of the bumper has two rails that it sits in. It is quite hard to put the bumper back on without a second person helping you.
- Be very careful reconnecting the hood pull latch, mine snapped when I went to reattach it.
The end...
Pictures of the finished project will come soon.
- Log in to post comments


Comments
David Slone (not verified)
May 27, 2013 - 21:36
Permalink
David Slone
Easiest method I found is to reach in with your fingers and press up on the tab. - David Slone
Brianna Taylor (not verified)
January 23, 2018 - 00:13
Permalink
Ed
People often face problems in the installing of headlines that become easy for them with follow of written points. Students get best progresses with hire of tᴏp cᴜstᴏm еssay sеrvіcеs on writers describe perfect reviews.
Anonymous (not verified)
March 8, 2018 - 09:59
Permalink
This is very useful
This is very useful information for industries because my friend is looking for the similar information from many days. I just visited the site with an http://www.rushmyessay.biz/ service. The installation procedure is typically hard, here it is easily explained.